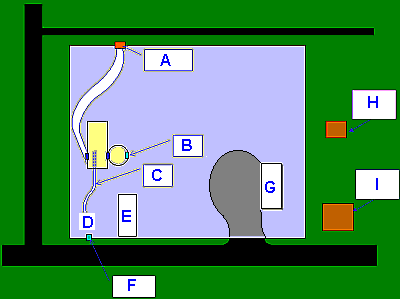
Diagram of the Jones Salvage Yard

Based on the descriptions
and illustrations, I have
put together a block diagram showing what seems to be the
layout of the Salvage Yard. As I said earlier, there is
some uncertainty in the placement of some landmarks, but
hopefully I have interpreted the clues and visual
evidence sufficiently. There are, of course, other
details that I could speculate on and add to the drawing,
but I've tried to stick pretty closely to what is readily
gleaned from the books themselves.
As you will see, I've also included my best guess of
where Headquarters is located within the salvage yard,
along with a possible location for the entries to Easy
Three, Door Four, and Tunnel Two. Information pertaining
to these is in the Headquarters section.
Consistent with "Stuttering Parrot," I've
placed Red Gate Rover on a street corner, although the
back street is more of an alley, according to "Fiery
Eye." Jupiter's house is on the opposite side of the
Salvage Yard from Headquarters because Jupiter walks past
the front gate en route to Green Gate One in "Screaming
Clock." I know that William Arden and M.V. Carey
both placed the Jones home across the street from the
Salvage Yard (in "Deadly Double" and "Flaming
Footprints," respectively), but I think the evidence
from Robert Arthur's books is pretty clear that the house
was intended to be beside the Salvage Yard.
If you see some more clues that will help refine the
picture of the Salvage Yard, please e-mail me and let me
know.

A. Red Gate Rover
B. Easy Three Entrance to boiler which leads to
Headquarters
C. Tunnel Two
D. Jupiter's outdoor workshop
E. Salvage Yard shed that hides Jupe's workshop from the
Salvage Yard Office
F. Green Gate One
G. The Jones Salvage Yard Office
H. Hans and Konrad's home
I. The Joneses' home

[Back to the
Jones Salvage Yard]
|
